Saturday, January 31, 2009

Pizza With Cashew Cheese, Pear, and Arugula

I've been wanting to try cashew cheese pizza ever since I noticed it on the menu at City o City. When I saw Clotilde's recipe for cashew cheese at Chocolate and Zucchini recently, I decided that the moment had come. Although I'd yet to taste cashew cheese, I picked a few ingredients that seemed cashew-friendly, and set about making my pizza.

For those who who have never had cashew cheese, it's actually not a cheese at all. Instead, it's a more of a nut paté that vegans use as an alternative to dairy. I've seen a few different versions of cashew cheese on the internet; I liked the simplicity of Clotide's recipe, which uses only puréed raw cashews, garlic, lemon juice, salt, and pepper. The result is reminiscent of a garlic-tinted, ricotta-textured cheese spread.

This pizza has elements of both sweet (pear) and savory (arugula, red onion, and cashew cheese). I did not use much red onion, as I find that the flavor can be overpowering; feel free to increase the amount of onion to your taste. One batch of cashew cheese yields more than enough for a single pizza; spread the remainder on crackers, use it in a sandwich, or make two pizzas!

Note: the cashew cheese is easy to assemble but requires a little advance work: the raw cashews need to be soaked for a few hours (I soaked them for 8 hours while I was at work) and the "cheese" needs to be prepared 24 hours before it is used.

Ingredients
One batch pizza dough (I use this recipe; store-bought dough is fine)
Olive oil (to brush on baking sheet)
1 tablespoon corn meal (to sprinkle on baking sheet)
Half a batch (about 3/4 cup) of cashew cheese
1 pear, washed and thinly sliced (I used a red pear, but any variety should work)
1 scant tablespoon thinly sliced red onion
3/4 cup arugula, washed, gently dried, and chopped

Preheat the oven to 500 degrees.
Roll out the dough, place it on a lightly oiled baking sheet that has been sprinkled with cornmeal, and shape the crust.
Spread a thin layer of cashew cheese on the pizza dough.
Top the cashew cheese with pear slices, red onion, and chopped arugula.
Bake on the bottom rack of the oven for about 10 minutes (keep an eye on your pizza as it may require a little less or a little more than 10 minutes - you'll know it's done when the crust begins to turn golden).
Remove from oven and serve.

Saturday, January 24, 2009

Beatrice Goes Granola

Granola with yogurt is one of my favorite breakfasts, so the recent granola recipe in the New York Times caught my eye. I wondered how homemade granola might compare to the stuff I buy in the store. And, as someone who grumbles about prices every time she walks down the cereal aisle, I wondered if homemade granola might be more affordable than store-bought.

The recipe provides a basic road map for homemade granola -- rolled oats, nuts and/or seeds, dried fruit, coconut, cinnamon, maple syrup or honey -- while leaving the reader leeway to choose the specific ingredients. I decided to try a basic granola involving walnuts and chopped dates.

I started by combining the oats, nuts, coconut, cinnamon, salt and dates in a large bowl (and when I say "large," I mean large -- a standard-sized mixing bowl will not cut it, because the recipe involves about 10 cups of dried ingredients).

If you've read the recipe, you'll notice that the dried fruit isn't supposed to be added until after the granola has been baked. Whoops. I hoped the dates might just wind up being a little chewier than normal, but they actually were crunchy (although still edible) after the granola cooled... Please learn from my mistake, and be sure to wait until after the granola is baked to add the fruit!

Next, I added about 1/2 cup maple syrup. The mixture became damp and a little clumpier, but was not completely drenched.

The recipe then directs that the granola be poured onto a baking sheet, and cooked at 350 F for about 30 minutes, stirring occasionally. My baking sheet doesn't have rims, and so I lined it with parchment paper and folded the edges of the paper up to help keep the granola from falling off. As you can see from the photo, the granola was really piled onto the sheet. It might be a good idea to bake the granola in two batches to help it cook more evenly and to make it easier to stir.

Baking granola smells fantastic...

After about 40 minutes of baking and stirring, the granola was a nice golden brown (the photos don't really capture the change in color).

How did it taste? Oatier (if that's a word) and fresher than store-bought granola. I was quite pleased with all the walnuts. My only criticism would be regarding the crunchy dates, and those were my own fault.

And how did the price compare? As I figure it, the granola cost about $9.36 to make, broken down as follows:

1 cup chopped dates: $1.60
2 cups walnuts: $2.69
a generous six cups bulk rolled oats: $1.83
1 cup unsweetened shredded coconut: $.91
1/2 cup maple syrup: $2.33
salt and cinnamon: negligible

The recipe yielded about 10 cups of granola. Bulk granola starts at about $3 per pound at Whole Foods, and I sometimes buy about 8.5 cups (1 pound 19 ounces) of boxed granola for $4.39. The homemade granola cost about $.94 per cup to make (plus baking time), while the boxed store-bought granola costs about $.52 per cup. While the oats are relatively inexpensive, the add-ins and sweetener really add up.

Conclusion: homemade granola may have certain benefits, including freshness and the ability to choose your own ingredients, but price is not one of them.

Saturday, January 17, 2009

Carrot and Chickpea Tagine with Homemade Bread

This weekend, I decided to try recipes from my two new cookbooks: a carrot and chickpea tagine from the book "Tagine: Spicy Stews from Morocco" by Chillie Basan, and homemade bread from Mark Bittman's "How to Cook Everything Vegetarian."

The two cookbooks are different in many ways -- "Tagine" is a slim volume with both veg and nonveg recipes which focuses specifically on the cuisine of Morocco, while "How to Cook Everything Vegetarian" is really more of an encyclopedia of vegetarian cooking, outlining basic principles and then encouraging readers to experiment with different variations. Yet, both books have an emphasis on simplicity, which is something I really appreciate when I'm working my way through a new recipe.

The carrot and chickpea tagine begins by sautéeing onion and garlic, then adding carrots, honey, and spices and simmering them in a tagine (I used a chef's skillet with a lid) until the carrots are soft. Canned chickpeas are then added and, then, after the mixture has cooked a bit more, salt, rosewater and cilantro finish the dish. (I had rosewater on hand, but I think the recipe would still work without it.) The result is a spicy-sweet stew that was really good with a scoop of Greek yogurt and fresh lemon slices.

"Tagine" recommended serving the stew with bread, so I decided to attempt Bittman's Fast French Bread. While I watched my mom knead many a loaf while I was growing up, this was my first attempt at making my own bread. The recipe is very similar to the no-knead recipe that other bloggers have covered: flour, yeast and salt are combined in a food processor, and water is then added to create a ball of dough.

I was convinced that the salt was going to kill the yeast before it had a chance to work its magic, but, after letting the dough sit for two hours, I was pleased to see that it had nicely doubled. I kneaded a little additional flour into the dough and formed a round loaf, which I placed on a lightly greased pizza pan that had been sprinkled with cornmeal. After allowing the dough to rise for another hour, I topped it with sesame seeds and placed it into the oven for about 40 minutes. Per Bittman, I slid a cooking thermometer into the center of the bread to be sure it had reached 210 F before turning off the oven.

The result was a nice crusty loaf with good flavor, and an apartment full of fresh-baked-bread smell. While the recipe took several hours from start to finish, there was very little hands-on time. I suspect I'll be making homemade bread more often.

Saturday, January 10, 2009

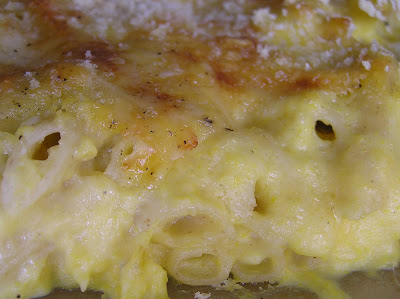
The Best Homemade Mac and Cheese EVER

It's no secret that I like macaroni and cheese. I don't think I've ever encountered a version of the dish that I didn't like. At the same time, I've never had mac and cheese quite as good as this.

Golden color*? Check. Creamy smooth sauce beneath a crispy topping? Check. Rich, cheesy flavor? Check.

I'd like to take credit for this one, but really it's just a variation on a mac and cheese recipe that Food Blogga published last year. Yes, the recipe with pureéd cauliflower blended into the cheese sauce. This time, I omitted the southwestern seasoning and added 3/4 cup grated Gruyere to the cheddar cheese called for in the recipe. I wasn't sure how the two cheeses would do together, and, as I added the Gruyere to the sauce, I wondered if I was about the ruin a perfectly good batch of mac and cheese. I might have blown things nutritionally, but the flavors of the two cheeses blended wonderfully, to create the best-tasting mac and cheese sauce that I've ever had. And, this is coming from someone who eats a lot of mac and cheese.

*I managed to find an orange cauliflower at the grocery, which helped boost the color.

Thursday, January 1, 2009

"Enjoy Every Sandwich" (Veggie Reuben)

2008 brought a number of changes for me. One of those changes has been the way I feel about this blog, which began as a way of sharing my enjoyment of vegetarian food, but has recently come to feel like an obstacle to that enjoyment. I like taking pictures, but it can be tiresome to have to photograph everything before eating it. Finding the time to compose regular posts can be a challenge, and, while I have a pretty diverse eating pattern, sometimes I'd like to eat nothing but quesadillas for a week without worrying about what blog readers might think.

In short, I need to step back, heed the late, great Warren Zevon's advice, and enjoy every sandwich. This blog will continue, but posting will be less frequent: perhaps once a week, perhaps once a month.

Although Warren was not vegetarian, his song titles lend themselves quite naturally to conversations about vegetarian living. For example:

Q: Did your family agree to forgo turkey at Thanksgiving?
A: No, Momma Couldn't Be Persuaded.

Q: How did I goof up such a basic recipe for mac and cheese?
A: Accidentally Like a Martyr.

Q: I thought this green chili was vegetarian, but I just bit into a piece of pork!
A: Don't Let Us Get Sick/Poor Poor Pitiful Me.

Q: What if we add some red pepper flakes to that?
A: Genius.

Warren might have preferred something from the Pioneer Chicken Stand, but I'm starting 2009 with a veggie reuben. In this version, cabbage and onion are sautéed in a blend of canola oil and caraway seed, then stacked, with baked portobello, dressing and Gruyere cheese, between slices of rye bread. Somewhat messy, but worth it.

Best wishes for 2009, and enjoy every sandwich.

Ingredients (for 5 sandwiches)
10 slices rye bread
1/4 cup plus 1 tablespoon canola oil, divided
1 teaspoon caraway seed
1/2 head cabbage, washed and chopped
1 onion, washed and sliced into thin strips
5 portobello mushrooms, washed, gently dried and stems removed
3/4 teaspoon salt, divided
black pepper to taste
5 ounces Gruyere cheese
"Russian" dressing (recipe below)

To Make the Cabbage Mixture:
Heat 1 tablespoon oil and caraway seeds in a large fry pan over medium heat.
Add the cabbage, onions and 1/2 teaspoon salt.
Cook, stirring only occasionally, until the cabbage and onions are browned (see photo above).
Remove from heat.

To Make the Baked Portobellos:

Preheat oven to 375 F.
In a medium bowl, blend together 1/4 cup canola oil, 1/4 teaspoon salt and black pepper to taste.
Cut each portobello cap into 5-6 thick strips.
Toss with the oil mixture.
Lay the portobello slices in single layer in a baking dish (the mushrooms will release moisture when cooked, so I recommend a baking dish over a cookie sheet).
Bake 15 minutes.
While the portobellos are baking, place a wire rack on a counter or table, with a cookie sheet underneath.
Remove from oven.
Use a spatula/turner or tongs to remove portobellos from the baking dish and place on the wire rack to drain.

"Russian" Dressing
In a small bowl, combine:

1/3 cup mayonnaise/canola mayo/soy mayo
1 roma tomato, washed and finely chopped
1 scallion, washed and chopped
1 teaspoon cider vinegar
1/2 teaspoon salt
1/2 teaspoon honey
black pepper to taste

To Assemble the Sandwich:

Lay two slices of rye bread on a baking sheet.
Top the first slice of bread with 1/5 of the portobello slices, and the second with 1/5 of the cabbage mixture.
Place thin slices of Gruyere on top of the portobello and the cabbage mixture.
Broil until the cheese is soft and bubbly.
Remove from oven.
Place the portobello slice face up on a plate.
Top with "Russian" dressing.
Place the cabbage mixture slice face down on top of the portobello and dressing.
Enjoy.